Showing posts with label Sew for yourself. Show all posts

Tuesday, March 20, 2012

Sew For Yourself: Rain Cloud Burp Cloth


For this project you can use brand new fabric, or you can upcycle some fabric.
I used a blouse that was just waiting to be transformed into something else.  


I started by cutting out a rectangle from the back section of the blouse.


Then I cut out a piece of white fleece, the same size as the rectangle I cut for the blouse.


Placing right sides together, I sewed the fleece and blouse piece together, leaving a small section unsewn so I could turn the burp cloth right side out.

(Small Hole)

After I turned the burp cloth right side out, I hand sewed the small hole closed.

Now you should have something that looks like this:

Here comes the fun part!
Using white felt, I cut a cloud and rain drops out and pinned them onto the burp cloth.

I also added some fancy stitch work to the edges...this is totally optional.

Next, sew your raincloud and raindrops on.  
When I flip my burp cloth over, I not only have the design on the front, but it created a neat monotone design on the back.  I love these easy details!


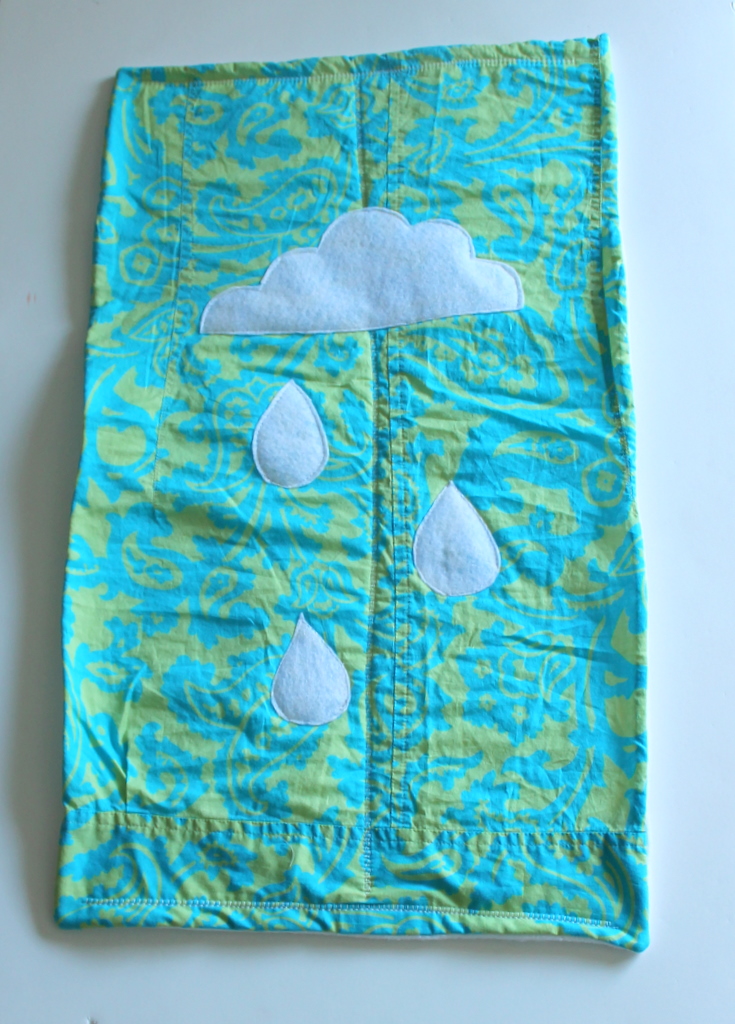
I'm a fan of the lime and aqua fabric against the stark white.  Makes for a very unique and soft burp cloth for your little one...or the perfect gift for someone else's little one!


I love seeing your re-creations!
Please email me a picture or link to your blog if you decide to make your own burp cloth :)

This morning I am headed to my 36 week check up.
I don't remember feeling all this heaviness with Caleb.
This week, I think I may be experiencing what they call "dropping".
Suddenly my belly feels so heavy and I also feel like I've morphed back to the 1st trimester with the amount of potty trips I'm taking.  So much pressure everywhere!
I've also had contractions.  Several random ones just about every day and I definitely didn't experience that with Caleb.
I guess they are Braxton Hicks although some hurt way worse than others!
We will see what the doctor says today.
I'm getting antsy to meet this little squishy babe!

Monday, January 23, 2012

Sew-For-Yourself: Monogrammed Apron


Step 1: Start with a square piece of fabric.
I chose a light blue and white seersucker...you can use anything for this project!

Step 2: Hold it up to your "client" and get an about measurement of where to cut for the arms.  
This can be made for a child or an adult! 

Step 3:  Cut armholes as shown.

In order to get matching armholes, fold your material in half, length wise after you cut the first armhole and use that as a guideline to cut your second armhole (pictured below):


Now your material should look like this:

Step 4: Hem all edges.
I serged around the edges first and then did a 1/4" hem with my sewing machine all the way around.


 Step 5: Add elastic to neck line.
I cut a piece of narrow elastic, pinned it to each side of the top and sewed straight across.  I chose to use elastic for the neck because now my little "client" can pull it on and off easily without needing me to tie it for him.


Step 6: Add ribbon to sides of apron.
I had a roll of wide, grosgrain ribbon on hand.  I cut two equal pieces and sewed each one onto either side of the apron, right at the base of the arm cut outs.


I added some fray check to the ends of my ribbon to keep it from fraying and looking sloppy.


Step 7: Grab some felt and cut out your monogram letter.
I used black for contrast.  I free-handed the letter C, but you could print out a letter from your computer, cut it out, pin it onto the felt and cut around it if you are looking for a certain font, like a pretty cursive!


Pin the letter on and carefully stitch it onto your apron.


This is an optional step.  I used my remaining pieces that I cut from my arm holes in step 3 to make a pocket.  

Just hem around the edges.
The left is a picture of what the back of your pocket will look like and the right side is what the front will look like:

Then I sewed the sides and bottom of the pocket onto the apron, leaving the top open.

Someone loved it.


He likes to "cook" with me.  In fact, we "cooked" up some chocolate milk as soon as he got his apron on!  He thinks stirring means he's cooking something good...so he get's to do lots of stirring :)
 Look at this kid.  He's so serious.


A little too much flour on his nose.

This apron would make a great gift too!  For birthday people of all ages :)
Easy, functional, fun and "client" approved!

Happy Monday everyone!
Don't forget, there's still one more day left to get your coupon codes for the Valentine Mug sets.
Valentines Day is only THREE weeks away!!!