


I love making things from pillow cases. You can find so many neat colors and prints for really great prices. This is a tutorial of a ruched pillow case top and is even great for a maternity top too!
Start out with a pillowcase of your choice and some matching, stretchy fabric. I am choosing to use the sleeves from a stretchy shirt that I no longer wear.
Measure the length of your pillow case and cut two strips about 3" shorter than the length of your pillowcase. These are about 5" wide.

Now, cut the top off of your pillowcase. Cut as little off as possible.

This will leave you with a pillowcase with open ends

Next, cut open each side of your pillowcase.

This will leave you with your two strips and the pillowcase, which has been cut completely apart.

Here is where is may start getting a little confusing. You are going to take your long strip and starting at the bottom finished edge of one of the pillowcase pieces, you will sew right sides together while slight stretching the strip. Remember that your strip is 3" shorter than your pillowcase and you want to end up stretching the strip so that it still ends up lining up with the top and bottom of your pillowcase piece. Stretching the strip while sewing will create a nice ruched look on the sides of your top...you will see in just a minute :)

You have now sewn one strip to one side of the pillowcase.

Grab your other pillowcase piece and do the same thing to it...sewing it to the strip, right sides together while slightly stretching the strip.

Your "top" should look like this. I like to think it looks like a rectangle butterfly. The strip in the middle and the two pillowcase pieces sewn on.

Grab your other strip and right sides together, stretch and sew it onto the pillowcase...are you getting the idea?

Here is a picture of me stretching the strip while sewing it onto the pillowcase (note: I am only stretching the strip, not the actual pillow case piece):

If you are still on track with me, your top should look like this:

It's time to finish the top edge of your top...I serged mine but you can just as easily do a zig zag stitch or a hem.

Here is the step where the tube top should start looking like an actual top. With right sides together, sew the strip onto the only remaining pillow case side that's left, stretching and sewing....last time!

Your top should look like this:

Grab some elastic, any size you would like. You are going to stretch and sew, with a zig zag stitch, the elastic around the top part of your pillowcase top...making sure that it is tight enough to hold your shirt onto you!

Sew the elastic all the way around until it meets.

Here is what the inside top of your pillowcase top will look like:

Here is what the top will look like when laid flat. This is where you have the choice to keep going or not. If you like your top the way it is, then you're done! I however wanted a little more ruching on the sides, so.........

I cut a couple pieces of elastic and sewed them, while stretching, onto the inside of the strips, on both sides of my top.

It will look something like this on the inside:

Here comes the fun part! Trying it on!

I added a sash (that doesn't happen to match, but it was handy at the time!)

The ruching creates a fun, flattering side seam.

You may have to alter it a bit. Take in the sides or add more elastic so it fits better. It's pretty versatile so you can do a lot of things to it and with it to create a nice fit.

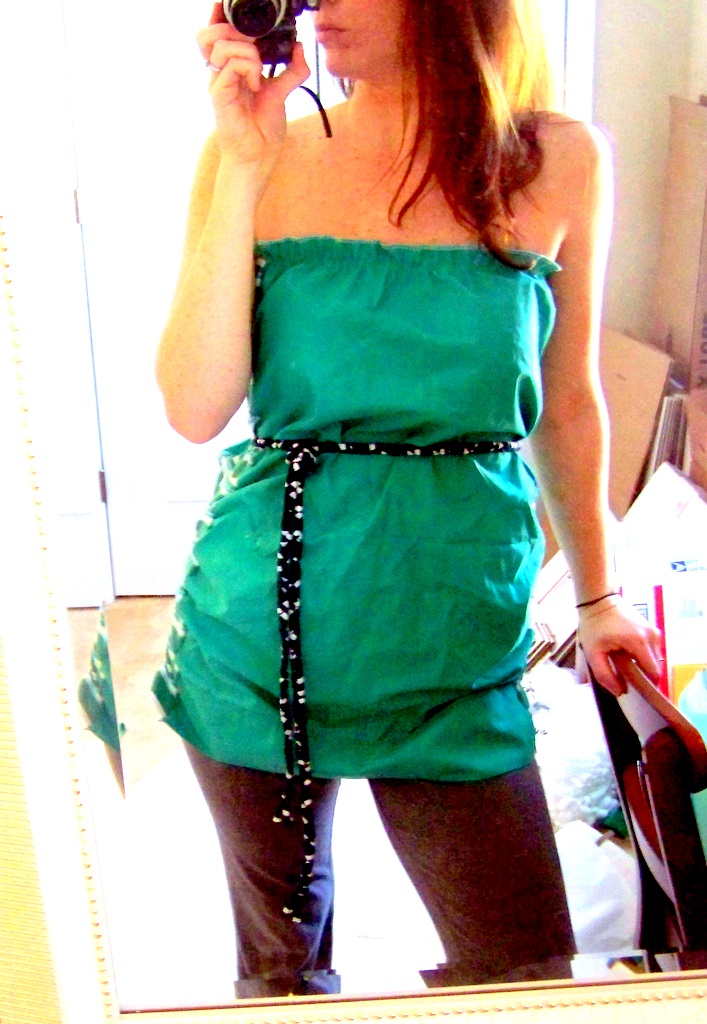
The new thing for maternity wear is ruched sides...making this top perfect for pregnancy too.
Wear it without a sash....

Or with a sash!
AND its great for post pregnancy for hiding the belly and for nursing a baby.

If any of you try this out, will you PLEASE email me a pic???? I would love to see what you come up with!


2 comments:
Love this! It's so cute! What a great idea =)
I'm going to try and make this! I'll let you know how it goes!
Post a Comment